
Dahlias are a very intimidating flower to grow.
First, they’re expensive. And because they’re expensive, gardeners get very worried about killing them (even more than they would about the average plant).
Second, they are late bloomers, so there is a good chance that if you garden in a short season, you might not even see your blooms (which is a small tragedy)!
If you do get some tubers, grow a successful crop of dahlias, and manage to overwinter them (which in itself is a giant learning curve), then comes the next question: how do I divide them?
When I first started with dahlia tubers, I was so scared to divide them!
I had purchased these expensive tubers, and I didn’t want to ruin them by making the wrong cut. I decided that the most foolproof way to know where to divide the tubers was to wait until spring, when everything started greening up, which would make it clearer where to cut. Dividing in the fall is also a good method, once you’re more comfortable with the process.
Whether you plan to divide your tubers in spring or fall, what you learn in this blog post will help!
More of a visual learner? Watch the short video below:
The Basics of Dividing Dahlia Tubers
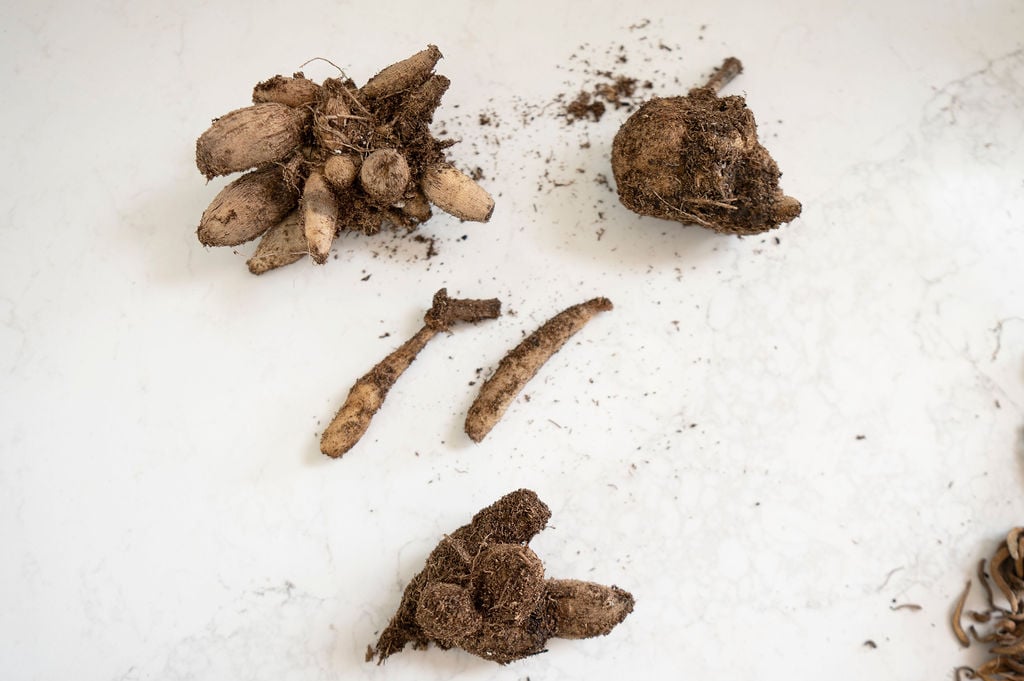
Every dahlia tuber must have four elements: a body, a neck, a head, and at least one eye.
The head of your dahlia tuber may have multiple eyes—sometimes two to four! The number of eyes typically indicates how eager the dahlia is to grow. When dividing dahlia tubers, it’s essential to ensure that each section has all four critical elements. If any of these elements are missing, the tuber may not survive!

If you’ve let your tubers wake up in the spring before dividing and they have a substantial amount of greenery, but only two or three of the listed parts are present, this is an exception to the four-element rule. Because you already have a successful bit of greenery, chances are the dahlia will live, and everything will work out, even if it doesn’t have a defined body, neck, head, or eyes.
If it’s earlier in the dividing process and one or more of the four elements have fallen off, it probably won’t work out. The dahlia won’t have enough energy to live! There are, of course, always exceptions, as some tubers just have an incredible will to live, but if you’re dividing in fall before overwintering, it’s best to stick to the four-element rule.
When you’re first starting out with dividing tubers, consider the four elements the general rule of thumb and go from there.

So, you’re ready to divide your tuber… What’s next?
When you’re ready to divide your dahlia tubers, it’s nice to have a pair of needlenose snips and a set of larger pruning shears on hand.
Most of your cuts will be made with the needlenose snips because they can reach into tighter spaces. However, you may encounter large clumps that are too difficult to cut with just the needlenose snips. In such cases, you’ll need to divide the big clump into halves or quarters first, then use the needle-nose snips for the finer work afterward.
I usually have to go in with the pruning shears first, then use the needle-nose snips afterward, when the tuber clumps are more compact and twisted. This mostly applies to the tubers I get from my mom’s garden. She has clay soil, and, because I have such sandy soil, I rarely have to do this with my own!
Want to see how I divide my tubers in spring? Watch the short video below:
Related: How to Get More Dahlias for Free with Cuttings
Some tubers clearly show their head, neck, and body, while others can be quite confusing. This is especially true when the bodies are small, round bulbs with necks barely visible, making it difficult to identify the head or see the eyes. It really depends on the variety of the tuber. As much as I’m trying to tell you how to do it in this blog post, you’ll just have to try it in real life and make those mistakes yourself.
I’ve found that over the years, I started with dividing the greened-up tubers first, then once I was more confident, I could divide them as soon as I took them out in spring, because I could make a good guess as to where the eyes would show once they started to wake up. Then once I got confident with that, I started dividing in the fall to save space!
At the end of the day, you have to do what works for you, your climate, and your experience level.
Related: How to Overwinter Dahlias in Cold Climates
If you liked this blog post, find me on Facebook, TikTok, and Instagram for more cold-climate vegetable gardening tips, delicious recipes, and cut flower goodness! I also make weekly videos over on my YouTube channel. I hope to see you there!
READY TO GROW YOUR OWN BEAUTIFUL CUT FLOWER GARDEN WITHOUT THE HASSLE?
I’ve taken all the guesswork out of creating a cut flower garden with my e-book, Cut Flowers Made Simple. It’s the perfect way for beginner and intermediate gardeners to start their own cut flower garden with or without seed starting.
Finally, you can create a stunning cut flower garden with everything you need to make beautiful bouquets all summer long.
Join the conversation